Thursday, 27 May 2010

Kid's Craft Idea - Robot

I just wanted to share this because I think it’s a great craft idea for a rainy day:

kids craft idea robot

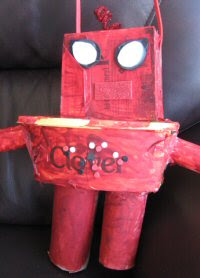
This is my eldest boy’s Spider Robot. He actually made the robot at school when they held a robot themed week, but the painting and decorations were added at home. Of course, he wanted to decorate it based on Spiderman so we painted him with red poster paint and then added fun foam Spiderman-style eyes, spider sequins and little circular buttons. I did find that the poster paint flaked off - particularly on the body, which was made from a plastic tub - so we added a second coat, this time mixing the poster paint with a little PVA glue. The paint stayed on a lot better after that.

I’ve now got a basket full of old cereal boxes, loo rolls and plastic tubs in the playroom so that we can do more crafts together like this in future!

Wednesday, 26 May 2010

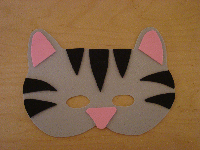
Fun Foam Cat Mask

Here are instructions for making a fun foam cat mask. As an alternative to fun foam, you could also print the mask template onto plain card and let your child colour it in.

This is a great Halloween craft for making a dressing up outfit such as a Catwoman fancy dress costume - just use black fun foam for making the cat mask.

You will need:

Fun foam
Scissors
PVA glue
Pipe cleaners
Elastic or lolly stick

cat mask

Using a template, draw the mask shape onto a piece of fun foam. Cut it out.

cat mask

Add stripes or other markings to your cat (optional) and pink fun foam to form the inside of the ears and the nose.

cat mask

Glue on four pipe cleaners to form the whiskers.

cat mask

Make a hole on each side of the mask (a hole punch is ideal for this, if you have one) and thread some elastic through.

Alternatively, if your child is like mine and doesn't like their masks being held in place by elastic, fix a lolly stick to the back of the mask with glue or tape so the mask can easily be held up to the face.

Cat mask template (right-click to save, re-size before printing):

Tuesday, 25 May 2010

Wooden Spoon Puppets

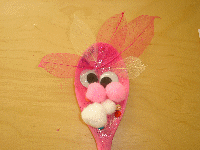
This is alovely craft idea for young children. Wooden spoons are cheap to buy – often they cost less than 30p or you can get an assorted pack for £1 - and you don't have to spend any extra money on craft materials to decorate the spoons if you don't want to. Most people have fabric scraps, wool, buttons, tin foil, etc, in their home which are just as useful for making a wooden spoon puppet as the googley eyes, fun foam and other items I've used below.

I've used a farm yard theme to illustrate this tutorial but there are hundreds of designs you could try. For example, snowmen and reindeer for a Christmas craft project. I've seen a great reindeer wooden spoon at Shannon Makes Stuff.

You will need:

Wooden spoon
Paint
PVA glue
Craft materials to decorate – for example wiggley eyes, glitter, pom poms, fun foam, wool

wooden spoon puppet

The first step is to paint the wooden spoon then let it to dry. It doesn't take long for poster paint to dry, but if you are doing this craft with an impatient toddler you might want to have the spoon already painted and dried before you start.

wooden spoon puppet

For the pig and cow cut the two ears, the nose and four legs out of foam. Glue these on, along with a pair of googley eyes. For the pig, I also made a twirly tail from a pinkcleaner and taped it to the back of the spoon.


For the cockerel cut a beak and two wings out of fun foam and glue these on, with two googley eyes. I used two yellow pom poms for the feet and two red skeleton leaves for the plummage on top of his head. You could also use red craft feathers

wooden spoon puppet

An easy spoon puppet theme to do with a very young child is 'monsters'. If you cover the spoon with glitter glue then it is very easy for them to stick on sequins, pom poms, buttons, etc, without help from an adult, so they are much more able to use their imagination. This monster spoon puppet was made by my two year old.

Homemade Playdough Recipe

1 Cup plain flour
1/2 Cup table salt
1 Teaspoon cream of tartar
1 Cup water
2 Teaspoons cooking oil
1 Teaspoon food colouring - optional

• Combine the flour, half a cup of salt and the cream of tartar in a saucepan.

• Cook over a low-medium heat, gradually pouring in the cup of water, cooking oil and food colouring (optional).

• Stir continually to stop the mixture sticking to the sides or burning. It will form a sticky ball.

• Remove from the heat and leave for half an hour, or until the dough has cooled, before allowing the child to play with it.

How To Make a Friendship Bracelet

Friendship bracelets are something that most girls want to make at some time in their lives. This craft is suitable for kids aged from about 7 upwards, as this method of making friendship bracelets can be too fiddley for younger children.

The guide for making a friendship bracelet below may look quite complicated at first glance, but once you've made a couple of rows you'll realise it's actually a very simple and fun craft! It's best to learn using four different coloured strands of thread, as I've used in this tutorial, but once you've got the hang of it, it's easy to experiment with different colours, patterns and numbers of strands.

You will need:

Embroidery thread (floss / yarn)
Scissors
Sellotape / safety pin


Cut four strands of embroidery thread to equal lengths (I've used yellow, purple, orange and blue in these instructions). I recommend making them about 30cm as it is better for them to be too long than too short (you can always trim the excess).

Knot the strands together at one end. Leave about two inches above the knot - you'll need this for tying the completed bracelet around the wrist.

Tape it to your work surface or stick a safety pin through the knot and secure it to a cushion.

friendship bracelet

Step 1: Pass the yellow thread over then under the purple thread. The end of the yellow thread should pass through the centre of the loop you have just formed.

Tighten this half knot by holding the purple strand and pulling the yellow strand taut.

Repeat the above actions and you will have formed a completed knot on the purple strand.

friendship bracelet

Step 2: The yellow strand should now be between the purple and the orange.

Repeat step one, but this time bringing the yellow strand over and under the orange.

friendship bracelet

Step 3: The yellow strand will now be between the orange and the blue.

Repeat step one, but bringing the yellow strand over and under the blue.

friendship bracelet

The yellow strand of embroidery thread will now be on the right hand side - you have completed your first row!

friendship bracelet

Repeat steps one to three for the purple strand (bringing it over and under the orange, the blue and finally the yellow).

Repeat steps one to three for the orange strand (bringing it over and under the the blue, yellow and purple).

Repeat steps one to three for the blue strand (bringing it over and under the yellow, purple and orange).

friendship bracelet

Carry on until the friendship bracelet has reached the desired length. Secure the threads with a knot and trim any excess thread so the 'tail' is a couple of inches long.

When tying the friendship bracelet to a wrist, do not do it too tightly. Leave it loose enough so that you can comfortably insert two fingers underneath it.
Friday, 21 May 2010

How To Make A Newspaper Pirate's Hat

Newspaper hats are an easy craft that your children will enjoy. If you live in an
area where you get a local paper delivered for free each week, it wont cost you a penny either!

You will need:

A newspaper
Pens/embellishments (optional)

newspaper pirate hat

You will need one sheet of newpaper to make a hat.

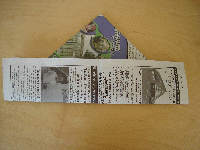
Place the sheet of newspaper on its side so the longest edges are vertical and the shortest edges are horizontal. Fold the sheet in half along the existing fold (the folded edge will be along the top).

newspaper pirate hat

Fold the newspaper from right to left and then unfold it again, to make a crease down the centre.

newspaper pirate hat

Fold down the top corners to meet the middle line.

newspaper pirate hat

Fold the bottom of the top layer of paper up and over the triangle you have created.

newspaper pirate hat

Turn the sheet of paper over and repeat with the bottom layer.

newspaper pirate hat

If you want, decorate your hat.

Open it out a little bit and it is ready to wear!

Welcome to Rainy Days Kid's Crafts!

Rainy Days Kid's Crafts was a kid's craft and activity website I started a few years ago (I think in around 2007). I recently decided against renewing the domain, however, as I couldn't justify the time and money the site was taking me to run. However, I know the site was popular and some people really liked it so I am now uploading all the old content to Blogger. This may take some time as blogging is completely new to me!

I hope you will find some of the kid's craft ideas useful. I'm no great talent when it comes to crafts so the emphasis of the tutorials is on easy, cheap projects that are just great fun for children and any parent or carer can manage!