Tuesday, 21 September 2010

Poseable Snake

An easy craft, intended for toddlers and pre-schoolers. A parent or carer will need to do the cutting out and fastenening the pieces together.

You will need:

Card
Scissors
PVA glue
Tissue paper
Paper fasteners/brads
Wiggley eyes


Cut out 3 strips of card of approximately 3cm x 13cm. I just used a cereal box. Curve the ends of the strips.


Cut your tissue paper into small pieces. Cover the card strips with PVA glue and let your child stick on the tissue paper. If your child prefers, they could paint or colour the snake in with crayons or pen instead.


When the glue has dried cut the excess tissue paper from around the edges.


Fasten the snake together using 2 paper fasteneners or brads. To finish, give him googley eyes.

Friday, 17 September 2010

Learning to knit

I am still very much a knitting novice, but I thought it would be fun to share some "how to knit" links. Basic knitting is something I learnt to do as a kid -nothing fancy, just scarves - but forgot about over the years once I stopped doing it.

When I had my second son I got the sudden urge to start knitting, (must have been the pregnancy hormones!), so I had to teach myself how to do it again. I've uploaded a picture of my son's baby blanket below. I used a very basic stitch to make little squares, sewed them all together and then stitched around the edge to finish it off. It took most of my pregnancy to complete and the finished product was quite small, but it was big enough to stick over his swaddling blanket on colder nights and I was pleased with my handiwork.


Here are the knitting links. I think the first one is the website I used the most when teaching myself to knit, but can't remember exactly because it was 2007:

Learn 2 Knit

Craft Yarn Council

YouTube is a great resource if you want to look for videos to help you understand the instructions. CyberSeams and eHow both provide good video tutorials on learning to knit.

Great simple craft projects for kids to do with knitting are scarves or blankets. They can graduate onto more complicated projects such as bags and hats later on.

Friday, 3 September 2010

How to make a TARDIS out of junk!

The kids are back at school! Here is one of the crafty things I did with eldest monkey (age 5) while he was off:

make a TARDIS

He wanted to make a TARDIS for his Matt Smith and David Tennant figures and this is what he came up with.

The main part of the TARDIS is a tissue box, with doors constructed from scraps of card and sellotaped on. The light is a cork covered in paper which I superglued on the top for him. He painted it and did the windows, etc, himself.

Not a bad way to spend an afternoon during our wash-out summer!

Wednesday, 7 July 2010

Salt Dough Door Plaque

Getting a ready made children's door plaque or buying wooden letters to spell out a child's name can work out expensive. So here is a craft project for a child to make their own - they will love their new door sign because it is all their own work.

Adapt this project to suit the resources you have available. For instance, if you don't have alphabet cookie cutters then you can paint the letters on. Or if you are spelling out a long name you may want to just use alphabet cookie cutters then decorate the letters in different colours and patterns. If you are feeling uninspired look at commerically available ones to get the ideas flowing!

You will need:

2 Cups plain white flour
Half a cup of salt
1 Cup hot water

Cookie cutters
Paint
Crafty embellishment (optional)
Varnish/PVA glue (optional)
Adhesive sticky pad squares

door plaque

For this kid's craft project, you will need to make microwaveable salt dough. Combine the flour and salt in a large bowl and gradually add the hot water. Stir till it forms a stiff dough.The quantities I give in the recipe on this site make 3 to 4 letters.

door plaque

Select the cookie cutter (or cutters) you want to use. If you want to do what I've done in this tutorial and cut the letter from the centre of the shape it will need to be fairly large.

Roll the dough out to a depth of about 1cm. Cut out a shape for every letter of the name or word you are spelling out.

Bake each finished shape in the microwave for approximately 2 minutes on each side (4 minutes in total).

door plaque

Paint each letter in whatever colours or designs you like. The letters on the left also have sequins on (in the centres of the flower) and are covered in glitter glue.

To make the letters more long lasting and to to give them a sheen cover them in varnish or PVA glue (it will dry clear) once the paint is dry. This step is optional.

door plaque

If you want to fix them to a door, you will need self adhesive foam squares. These are generally used in card making or scrapbooking so you can find them anywhere that sells art and craft supplies. Large ones are preferrable, but the 5mm size will fix the letters securely to the door too. If the letters you have made are small and light then Blu Tack my suffice for sticking them onto a door, (use several small pieces on the back of each letter).

Thursday, 17 June 2010

How to Make an Elephant Mask

This is a cheap and simple craft idea for young children.

You will need:

Four paper plates
Scissors
PVA glue/sellotape/stapler
Paint

elephant mask

You will need four paper plates to make your elephant.

Make eye holes in one of the paper plates. Cut one of the other plates in half and then trim off the edge - this will make the trunk.

elephant mask

Glue or tape the pieces of the mask together. Alternatively, fix it together with a stapler.

Paint or colour in the mask.

elephant mask

Your elephant mask is complete!

Thursday, 10 June 2010

Butterfly Stained Glass Window

Below are instructions for making a butterfly stained glass window from tissue paper. If you don't fancy doing your own design I've included a template at the end of this post. You will need to download it to your computer and resize it before printing it off.

Other easy designs you could try are flowers, fish and dragonflies.

You will need:

Black paper
Tissue paper or irridescent film (assorted colours)
Scissors
PVA glue

stained glass kids craft

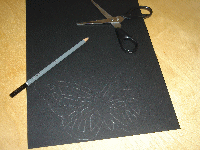
Draw your design onto black paper. If you don't have black paper, other colours should look fine too or you could even cut the design out of a cereal box and paint it black.

stained glass kids craft

Use scissors to cut out the butterfly and then enough small squares of tissue paper (or irridescent film) to cover the entire design. Cover the butterfly with a thin layer of PVA glue.


stained glass kids craft

Stick on the tissue paper squares, ensuring there are no gaps left. Leave it to dry.

stained glass kids craft

Trim any tissue paper which may be overlapping the edge of the butterfly and the stained glass window is finished! Stick it to the window with a little bit of blue tack.

Butterfly stained glass window template (right-click and save to computer before printing):

butterfly template

Friday, 4 June 2010

How to Make a Pom Pom Sheep

Pom poms are really easy to make. A sheep is used in this tutorial, but pom poms can be used to make a variety of creatures, for instance an Easter chick.

You will need:

Cardboard
Scissors
Wool
Black fun foam
Needle
Black thread
Wiggley eyes
Glue

pom pom sheep

Draw two circles, around 15cm in diameter, on a piece of card (a cereal box is ideal for this). A saucer may work well as a template. Then draw a smaller circle of around 6cm in diameter in the centre of them. Cut them out so that you have 2 donut shapes.

pom pom sheep

Put the two pieces of card together then tie the end of your wool around them. Pass the ball of wool through the centre of the card and start winding it around. If the ball of wall is too big to fit through the centre hole, cut off lengths of around 2 metres to work with instead.

Keep winding the wool around your cardboard template until it is completely covered. The more layers of wool, the thicker and fuller the finished pom pom will be.

pom pom sheep

Carefully cut around the edge of the pom pom.

pom pom sheep

When this is done, slide a length of wool between the two pieces of card and tie it really tightly around the centre of the pom pom, bringing the pieces of wool together and securing it.

pom pom sheep

Cut a head and four legs from a piece of black fun foam.

Sew these on by passing the needle through the centre of the pom pom. Glue two googley eyes onto the head to cover the stitch from where it has been sewn onto the pom pom.

pom pom sheep

The sheep is complete!

Tuesday, 1 June 2010

How to Make a Memory Scrapbook

This is something I did with my son when he was three years old. He loved cutting and sticking, painting and photos at that age so it is a great ongoing craft project for him, and I love the fact that I have a record of how his artistic skills were developing, and also of where we went and what he enjoyed at this age.

It could also be a good craft project for school age children who can keep a daily record of what they did during the school holidays.

Below is how we did our scrapbook, to give you inspiration.

You may need:

A scrapbook
Scissors
Glue
Art materials (pens, paint, crayons, etc)
Scrapbooking materials (sequins, stickers,etc)


kids craft ideas

The first thing you will need is something to create the scrapbook. It can be a sketchbook, proper scrapbook, pad of paper - whatever you have available. You could also just use normal paper and use a hole punch and ribbon to create your own book.

If your child draws a lot you can scan their artwork into the computer and get it printed up as a photobook by somewhere like Photobox.co.uk as a permanent record of their artwork. This potentially would also make a great present for a parent or grandparent!

kids craft ideas

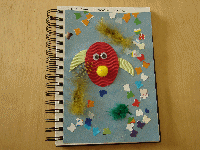
When we did our scrapbook we documented my son's likes and dislikes - the example in the photo above is a cutting and sticking picture he did of his favorite film (Aardman's 'The Curse of the Were-rabbit').

You could also stick in tickets to the zoo, etc, and other souveneirs of days out.

kids craft ideas

We also used the scrapbook to create reminders of days out. This is a picture he did of a parrot and some butterflies to remind him of his trip to Tropical Wings.

My little boy was obsessed with photos at the time, so we bought him a kids digital camera for his third birthday. Some of the photos he took were used for scrapbooking.

I hope this has given you some inspiration to help you get started!

Thursday, 27 May 2010

Kid's Craft Idea - Robot

I just wanted to share this because I think it’s a great craft idea for a rainy day:

kids craft idea robot

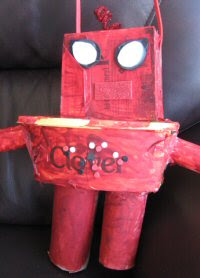
This is my eldest boy’s Spider Robot. He actually made the robot at school when they held a robot themed week, but the painting and decorations were added at home. Of course, he wanted to decorate it based on Spiderman so we painted him with red poster paint and then added fun foam Spiderman-style eyes, spider sequins and little circular buttons. I did find that the poster paint flaked off - particularly on the body, which was made from a plastic tub - so we added a second coat, this time mixing the poster paint with a little PVA glue. The paint stayed on a lot better after that.

I’ve now got a basket full of old cereal boxes, loo rolls and plastic tubs in the playroom so that we can do more crafts together like this in future!

Wednesday, 26 May 2010

Fun Foam Cat Mask

Here are instructions for making a fun foam cat mask. As an alternative to fun foam, you could also print the mask template onto plain card and let your child colour it in.

This is a great Halloween craft for making a dressing up outfit such as a Catwoman fancy dress costume - just use black fun foam for making the cat mask.

You will need:

Fun foam
Scissors
PVA glue
Pipe cleaners
Elastic or lolly stick

cat mask

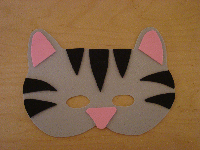
Using a template, draw the mask shape onto a piece of fun foam. Cut it out.

cat mask

Add stripes or other markings to your cat (optional) and pink fun foam to form the inside of the ears and the nose.

cat mask

Glue on four pipe cleaners to form the whiskers.

cat mask

Make a hole on each side of the mask (a hole punch is ideal for this, if you have one) and thread some elastic through.

Alternatively, if your child is like mine and doesn't like their masks being held in place by elastic, fix a lolly stick to the back of the mask with glue or tape so the mask can easily be held up to the face.

Cat mask template (right-click to save, re-size before printing):

Tuesday, 25 May 2010

Wooden Spoon Puppets

This is alovely craft idea for young children. Wooden spoons are cheap to buy – often they cost less than 30p or you can get an assorted pack for £1 - and you don't have to spend any extra money on craft materials to decorate the spoons if you don't want to. Most people have fabric scraps, wool, buttons, tin foil, etc, in their home which are just as useful for making a wooden spoon puppet as the googley eyes, fun foam and other items I've used below.

I've used a farm yard theme to illustrate this tutorial but there are hundreds of designs you could try. For example, snowmen and reindeer for a Christmas craft project. I've seen a great reindeer wooden spoon at Shannon Makes Stuff.

You will need:

Wooden spoon
Paint
PVA glue
Craft materials to decorate – for example wiggley eyes, glitter, pom poms, fun foam, wool

wooden spoon puppet

The first step is to paint the wooden spoon then let it to dry. It doesn't take long for poster paint to dry, but if you are doing this craft with an impatient toddler you might want to have the spoon already painted and dried before you start.

wooden spoon puppet

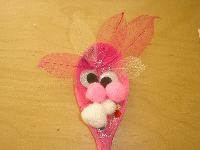
For the pig and cow cut the two ears, the nose and four legs out of foam. Glue these on, along with a pair of googley eyes. For the pig, I also made a twirly tail from a pinkcleaner and taped it to the back of the spoon.


For the cockerel cut a beak and two wings out of fun foam and glue these on, with two googley eyes. I used two yellow pom poms for the feet and two red skeleton leaves for the plummage on top of his head. You could also use red craft feathers

wooden spoon puppet

An easy spoon puppet theme to do with a very young child is 'monsters'. If you cover the spoon with glitter glue then it is very easy for them to stick on sequins, pom poms, buttons, etc, without help from an adult, so they are much more able to use their imagination. This monster spoon puppet was made by my two year old.

Homemade Playdough Recipe

1 Cup plain flour
1/2 Cup table salt
1 Teaspoon cream of tartar
1 Cup water
2 Teaspoons cooking oil
1 Teaspoon food colouring - optional

• Combine the flour, half a cup of salt and the cream of tartar in a saucepan.

• Cook over a low-medium heat, gradually pouring in the cup of water, cooking oil and food colouring (optional).

• Stir continually to stop the mixture sticking to the sides or burning. It will form a sticky ball.

• Remove from the heat and leave for half an hour, or until the dough has cooled, before allowing the child to play with it.

How To Make a Friendship Bracelet

Friendship bracelets are something that most girls want to make at some time in their lives. This craft is suitable for kids aged from about 7 upwards, as this method of making friendship bracelets can be too fiddley for younger children.

The guide for making a friendship bracelet below may look quite complicated at first glance, but once you've made a couple of rows you'll realise it's actually a very simple and fun craft! It's best to learn using four different coloured strands of thread, as I've used in this tutorial, but once you've got the hang of it, it's easy to experiment with different colours, patterns and numbers of strands.

You will need:

Embroidery thread (floss / yarn)
Scissors
Sellotape / safety pin


Cut four strands of embroidery thread to equal lengths (I've used yellow, purple, orange and blue in these instructions). I recommend making them about 30cm as it is better for them to be too long than too short (you can always trim the excess).

Knot the strands together at one end. Leave about two inches above the knot - you'll need this for tying the completed bracelet around the wrist.

Tape it to your work surface or stick a safety pin through the knot and secure it to a cushion.

friendship bracelet

Step 1: Pass the yellow thread over then under the purple thread. The end of the yellow thread should pass through the centre of the loop you have just formed.

Tighten this half knot by holding the purple strand and pulling the yellow strand taut.

Repeat the above actions and you will have formed a completed knot on the purple strand.

friendship bracelet

Step 2: The yellow strand should now be between the purple and the orange.

Repeat step one, but this time bringing the yellow strand over and under the orange.

friendship bracelet

Step 3: The yellow strand will now be between the orange and the blue.

Repeat step one, but bringing the yellow strand over and under the blue.

friendship bracelet

The yellow strand of embroidery thread will now be on the right hand side - you have completed your first row!

friendship bracelet

Repeat steps one to three for the purple strand (bringing it over and under the orange, the blue and finally the yellow).

Repeat steps one to three for the orange strand (bringing it over and under the the blue, yellow and purple).

Repeat steps one to three for the blue strand (bringing it over and under the yellow, purple and orange).

friendship bracelet

Carry on until the friendship bracelet has reached the desired length. Secure the threads with a knot and trim any excess thread so the 'tail' is a couple of inches long.

When tying the friendship bracelet to a wrist, do not do it too tightly. Leave it loose enough so that you can comfortably insert two fingers underneath it.

Friday, 21 May 2010

How To Make A Newspaper Pirate's Hat

Newspaper hats are an easy craft that your children will enjoy. If you live in an
area where you get a local paper delivered for free each week, it wont cost you a penny either!

You will need:

A newspaper
Pens/embellishments (optional)

newspaper pirate hat

You will need one sheet of newpaper to make a hat.

Place the sheet of newspaper on its side so the longest edges are vertical and the shortest edges are horizontal. Fold the sheet in half along the existing fold (the folded edge will be along the top).

newspaper pirate hat

Fold the newspaper from right to left and then unfold it again, to make a crease down the centre.

newspaper pirate hat

Fold down the top corners to meet the middle line.

newspaper pirate hat

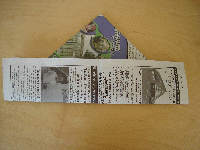
Fold the bottom of the top layer of paper up and over the triangle you have created.

newspaper pirate hat

Turn the sheet of paper over and repeat with the bottom layer.

newspaper pirate hat

If you want, decorate your hat.

Open it out a little bit and it is ready to wear!

Welcome to Rainy Days Kid's Crafts!

Rainy Days Kid's Crafts was a kid's craft and activity website I started a few years ago (I think in around 2007). I recently decided against renewing the domain, however, as I couldn't justify the time and money the site was taking me to run. However, I know the site was popular and some people really liked it so I am now uploading all the old content to Blogger. This may take some time as blogging is completely new to me!

I hope you will find some of the kid's craft ideas useful. I'm no great talent when it comes to crafts so the emphasis of the tutorials is on easy, cheap projects that are just great fun for children and any parent or carer can manage!