Showing posts with label childrens crafts. Show all posts

Friday, 3 September 2010

How to make a TARDIS out of junk!

The kids are back at school! Here is one of the crafty things I did with eldest monkey (age 5) while he was off:

make a TARDIS

He wanted to make a TARDIS for his Matt Smith and David Tennant figures and this is what he came up with.

The main part of the TARDIS is a tissue box, with doors constructed from scraps of card and sellotaped on. The light is a cork covered in paper which I superglued on the top for him. He painted it and did the windows, etc, himself.

Not a bad way to spend an afternoon during our wash-out summer!

Wednesday, 7 July 2010

Salt Dough Door Plaque

Getting a ready made children's door plaque or buying wooden letters to spell out a child's name can work out expensive. So here is a craft project for a child to make their own - they will love their new door sign because it is all their own work.

Adapt this project to suit the resources you have available. For instance, if you don't have alphabet cookie cutters then you can paint the letters on. Or if you are spelling out a long name you may want to just use alphabet cookie cutters then decorate the letters in different colours and patterns. If you are feeling uninspired look at commerically available ones to get the ideas flowing!

You will need:

2 Cups plain white flour
Half a cup of salt
1 Cup hot water

Cookie cutters
Paint
Crafty embellishment (optional)
Varnish/PVA glue (optional)
Adhesive sticky pad squares

door plaque

For this kid's craft project, you will need to make microwaveable salt dough. Combine the flour and salt in a large bowl and gradually add the hot water. Stir till it forms a stiff dough.The quantities I give in the recipe on this site make 3 to 4 letters.

door plaque

Select the cookie cutter (or cutters) you want to use. If you want to do what I've done in this tutorial and cut the letter from the centre of the shape it will need to be fairly large.

Roll the dough out to a depth of about 1cm. Cut out a shape for every letter of the name or word you are spelling out.

Bake each finished shape in the microwave for approximately 2 minutes on each side (4 minutes in total).

door plaque

Paint each letter in whatever colours or designs you like. The letters on the left also have sequins on (in the centres of the flower) and are covered in glitter glue.

To make the letters more long lasting and to to give them a sheen cover them in varnish or PVA glue (it will dry clear) once the paint is dry. This step is optional.

door plaque

If you want to fix them to a door, you will need self adhesive foam squares. These are generally used in card making or scrapbooking so you can find them anywhere that sells art and craft supplies. Large ones are preferrable, but the 5mm size will fix the letters securely to the door too. If the letters you have made are small and light then Blu Tack my suffice for sticking them onto a door, (use several small pieces on the back of each letter).

Thursday, 17 June 2010

How to Make an Elephant Mask

This is a cheap and simple craft idea for young children.

You will need:

Four paper plates
Scissors
PVA glue/sellotape/stapler
Paint

elephant mask

You will need four paper plates to make your elephant.

Make eye holes in one of the paper plates. Cut one of the other plates in half and then trim off the edge - this will make the trunk.

elephant mask

Glue or tape the pieces of the mask together. Alternatively, fix it together with a stapler.

Paint or colour in the mask.

elephant mask

Your elephant mask is complete!

Thursday, 10 June 2010

Butterfly Stained Glass Window

Below are instructions for making a butterfly stained glass window from tissue paper. If you don't fancy doing your own design I've included a template at the end of this post. You will need to download it to your computer and resize it before printing it off.

Other easy designs you could try are flowers, fish and dragonflies.

You will need:

Black paper
Tissue paper or irridescent film (assorted colours)
Scissors
PVA glue

stained glass kids craft

Draw your design onto black paper. If you don't have black paper, other colours should look fine too or you could even cut the design out of a cereal box and paint it black.

stained glass kids craft

Use scissors to cut out the butterfly and then enough small squares of tissue paper (or irridescent film) to cover the entire design. Cover the butterfly with a thin layer of PVA glue.


stained glass kids craft

Stick on the tissue paper squares, ensuring there are no gaps left. Leave it to dry.

stained glass kids craft

Trim any tissue paper which may be overlapping the edge of the butterfly and the stained glass window is finished! Stick it to the window with a little bit of blue tack.

Butterfly stained glass window template (right-click and save to computer before printing):

butterfly template

Tuesday, 1 June 2010

How to Make a Memory Scrapbook

This is something I did with my son when he was three years old. He loved cutting and sticking, painting and photos at that age so it is a great ongoing craft project for him, and I love the fact that I have a record of how his artistic skills were developing, and also of where we went and what he enjoyed at this age.

It could also be a good craft project for school age children who can keep a daily record of what they did during the school holidays.

Below is how we did our scrapbook, to give you inspiration.

You may need:

A scrapbook
Scissors
Glue
Art materials (pens, paint, crayons, etc)
Scrapbooking materials (sequins, stickers,etc)


kids craft ideas

The first thing you will need is something to create the scrapbook. It can be a sketchbook, proper scrapbook, pad of paper - whatever you have available. You could also just use normal paper and use a hole punch and ribbon to create your own book.

If your child draws a lot you can scan their artwork into the computer and get it printed up as a photobook by somewhere like Photobox.co.uk as a permanent record of their artwork. This potentially would also make a great present for a parent or grandparent!

kids craft ideas

When we did our scrapbook we documented my son's likes and dislikes - the example in the photo above is a cutting and sticking picture he did of his favorite film (Aardman's 'The Curse of the Were-rabbit').

You could also stick in tickets to the zoo, etc, and other souveneirs of days out.
kids craft ideas

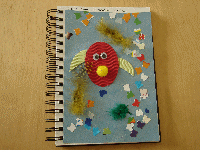
We also used the scrapbook to create reminders of days out. This is a picture he did of a parrot and some butterflies to remind him of his trip to Tropical Wings.

My little boy was obsessed with photos at the time, so we bought him a kids digital camera for his third birthday. Some of the photos he took were used for scrapbooking.

I hope this has given you some inspiration to help you get started!