This is a cheap and simple craft idea for young children.
You will need:
Four paper plates
Scissors
PVA glue/sellotape/stapler
Paint
You will need four paper plates to make your elephant.
Make eye holes in one of the paper plates. Cut one of the other plates in half and then trim off the edge - this will make the trunk.
Glue or tape the pieces of the mask together. Alternatively, fix it together with a stapler.
Paint or colour in the mask.
Your elephant mask is complete!
Thursday 17 June 2010
Thursday 10 June 2010
Butterfly Stained Glass Window
Below are instructions for making a butterfly stained glass window from tissue paper. If you don't fancy doing your own design I've included a template at the end of this post. You will need to download it to your computer and resize it before printing it off.
Other easy designs you could try are flowers, fish and dragonflies.
You will need:
Black paper
Tissue paper or irridescent film (assorted colours)
Scissors
PVA glue
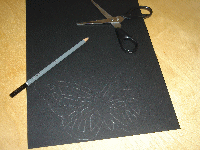
Draw your design onto black paper. If you don't have black paper, other colours should look fine too or you could even cut the design out of a cereal box and paint it black.
Use scissors to cut out the butterfly and then enough small squares of tissue paper (or irridescent film) to cover the entire design. Cover the butterfly with a thin layer of PVA glue.
Stick on the tissue paper squares, ensuring there are no gaps left. Leave it to dry.
Trim any tissue paper which may be overlapping the edge of the butterfly and the stained glass window is finished! Stick it to the window with a little bit of blue tack.
Butterfly stained glass window template (right-click and save to computer before printing):
Friday 4 June 2010
How to Make a Pom Pom Sheep
Pom poms are really easy to make. A sheep is used in this tutorial, but pom poms can be used to make a variety of creatures, for instance an Easter chick.
You will need:
Cardboard
Scissors
Wool
Black fun foam
Needle
Black thread
Wiggley eyes
Glue
Draw two circles, around 15cm in diameter, on a piece of card (a cereal box is ideal for this). A saucer may work well as a template. Then draw a smaller circle of around 6cm in diameter in the centre of them. Cut them out so that you have 2 donut shapes.
Put the two pieces of card together then tie the end of your wool around them. Pass the ball of wool through the centre of the card and start winding it around. If the ball of wall is too big to fit through the centre hole, cut off lengths of around 2 metres to work with instead.
Keep winding the wool around your cardboard template until it is completely covered. The more layers of wool, the thicker and fuller the finished pom pom will be.
Carefully cut around the edge of the pom pom.
When this is done, slide a length of wool between the two pieces of card and tie it really tightly around the centre of the pom pom, bringing the pieces of wool together and securing it.
Cut a head and four legs from a piece of black fun foam.
Sew these on by passing the needle through the centre of the pom pom. Glue two googley eyes onto the head to cover the stitch from where it has been sewn onto the pom pom.
The sheep is complete!
Tuesday 1 June 2010
How to Make a Memory Scrapbook
This is something I did with my son when he was three years old. He loved cutting and sticking, painting and photos at that age so it is a great ongoing craft project for him, and I love the fact that I have a record of how his artistic skills were developing, and also of where we went and what he enjoyed at this age.
It could also be a good craft project for school age children who can keep a daily record of what they did during the school holidays.
Below is how we did our scrapbook, to give you inspiration.
You may need:
A scrapbook
Scissors
Glue
Art materials (pens, paint, crayons, etc)
Scrapbooking materials (sequins, stickers,etc)
The first thing you will need is something to create the scrapbook. It can be a sketchbook, proper scrapbook, pad of paper - whatever you have available. You could also just use normal paper and use a hole punch and ribbon to create your own book.
If your child draws a lot you can scan their artwork into the computer and get it printed up as a photobook by somewhere like Photobox.co.uk as a permanent record of their artwork. This potentially would also make a great present for a parent or grandparent!
When we did our scrapbook we documented my son's likes and dislikes - the example in the photo above is a cutting and sticking picture he did of his favorite film (Aardman's 'The Curse of the Were-rabbit').
You could also stick in tickets to the zoo, etc, and other souveneirs of days out.
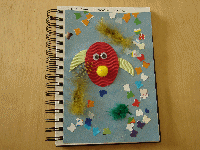
We also used the scrapbook to create reminders of days out. This is a picture he did of a parrot and some butterflies to remind him of his trip to Tropical Wings.
My little boy was obsessed with photos at the time, so we bought him a kids digital camera for his third birthday. Some of the photos he took were used for scrapbooking.
I hope this has given you some inspiration to help you get started!
Labels:
childrens crafts,
kids craft ideas,
kids crafts,
scrapbook,
scrapbooking
Subscribe to:
Posts (Atom)